
Linux distributions (such as Ubuntu, Fedora etc.) have the ability to be installed on a USB disk, even some Linux distros are just designed to do that (Gparted etc.) Microsoft introduced this feature in Windows 8 (quite late…) but there is a restriction even on that – this feature was only available in the enterprise edition of Windows 8. As it was only for enterprise version of Windows 8/8.1 it was not so useful for everyone, but in this article we will use a tool that lets us make a Portable windows installation on any version of Windows 8/8.1
What is meant by portable?
A portable OS sitting on your USB flash disk or HDD is able to boot on any computer, you can make a portable Windows 8 or 8.1 installation and carry a fully-personalized OS in your pocket. All you have to do is just plug the USB and then boot through it.
Some Geeks then found a way to do that manually, but the process is a bit complicated. So here we are, we will use a third party software to install Windows 8 on a USB disk.
What we need to prepare a portable USB
Following are the ingredients you will need to bake a sweet Windows 8 Portable USB:
- A USB disk: that can be either a pen drive or even a USB hard drive, the lowest size that will work is 13 GB. Remember that is for the installation only, to install anything you do need a bit extra. Although it will work on any USB 2.0 disk we highly recommend using a USB 3.0 as that will be much faster.
- Installation Media: Microsoft made Windows to go feature requires enterprise version of windows 8. This method will work on any version of Windows 8 or Windows 8.1 you are free to use the standard or pro version of Windows 8. You can use your Windows 8 or 8.1 installation disk or am disk image.
- AOMEI partition assistant: It is the software we will use to prepare USB. The tool is available free. You can download it form here.
Let’s Begin
- Plug in your USB disk in computer and backup all the data in the disk: The Partition Assistant tool will format the disk into NTFS format and all data in the USB disk will be erased, so it is always a good idea to backup all the data of USB before proceeding.
- Open AOMEI partition assistant standard assistant tool: After you have fired up the Partition assistant tool, you will see something like this:

3. On the left hand side area click on Windows to go creator
4. On the next screen select your USB flash disk.
Note: if your disk is not visible click in the Refresh button.
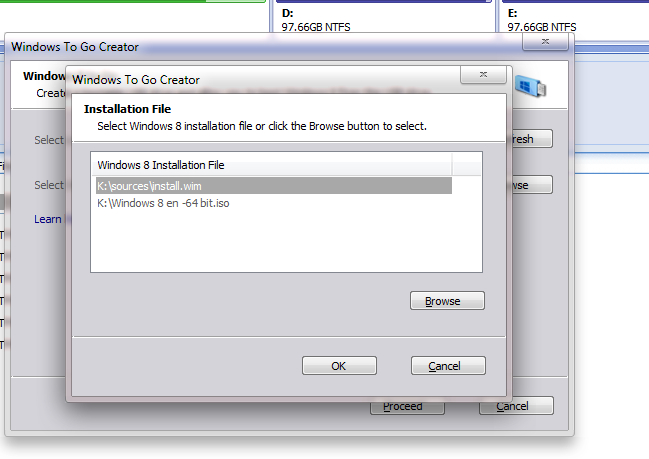
5.After you have selected the USB disk now click on the Browse button and locate your Windows installation media.
You can mount any disk image or insert your installation DVD in appropriate disk drive. If the installation media is in a folder then select the install.wim file.

6.Click on Proceed button
Just after you hit Proceed, the Partition assistant will then extract and install all the necessary files you need to boot from the USB disk.
Booting from the USB
After you have successfully created the USB Flash disk, you can boot your portable environment on any computer. To do that, just plug in your USB Stick into computer and power up the machine, if the computer doesn’t boot from the USB disk you will need to dig through BIOS and change the boot order. The key to open BIOS is usually DEL, F12 or F2 although it may be different according to the maker.
That’s it! now you have a fully functional Portable Windows 8 or windows 8.1 installation on your USB key if you find any problem or have any question don’t forget to drop your comment.
Image credit:Esparta Palma On flikr


I tried this: creating the USB disk took 1 1/2 hours on a machine with a USB 3.0 drive in USB 3.0 port, transferring only 5.7 GB, which is very slow. Also the boot does not work, I tried it on 2 different machines. Windows logo appears, neverending circle of dots, the USB drive is visibly not read. So: unfortunately, this does not work for me!
Excellent, works like a charm.
Microsoft should have made the feature available in all versions.